Securing an agent isn’t a setting you toggle — it’s an engineering process you run before and during deployment. The gap is real: in Saviynt’s 2026 CISO AI Risk Report, 47% of CISOs had already seen agents behave in unintended or unauthorized ways, and only 5% were confident they could contain a compromised agent. With Gartner projecting 40% of enterprise apps will embed task-specific agents by the end of 2026, the question of how to secure AI agents has moved from theory to a build task. This guide is the step-by-step version — and most of these controls land in one place if you route every call through a gateway like OrcaRouter.
Quick take: You can’t make a model un-trickable, so secure the boundary instead. Work through seven steps in order — threat-model, scope tools, validate I/O, redact PII, gate high-impact actions, monitor, and red-team. Each one shrinks the blast radius of a compromised agent. None of them require trusting the model.
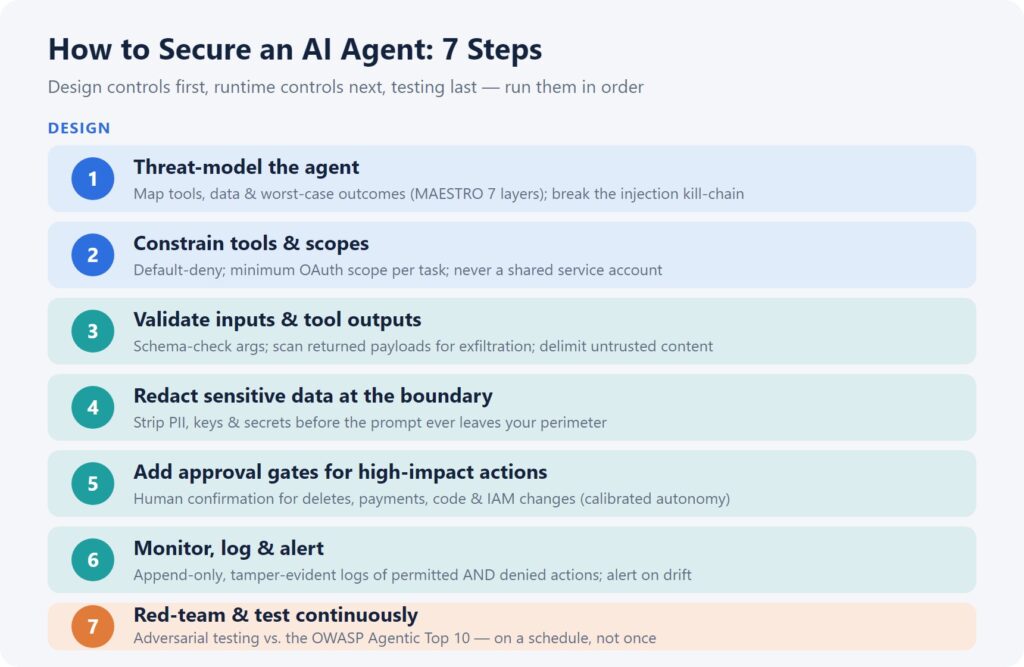
Table of Contents
Step 1 — Threat-model the agent
Start by writing down what the agent can touch: its tools, data sources, connectors, and the worst-case outcome of each (data exfiltration, destructive writes, money movement). The MAESTRO framework — “Multi-Agent Environment, Security, Threat, Risk, and Outcome” — maps threats across seven layers, from foundation model to agent ecosystem, and beats generic STRIDE here because it accounts for autonomy. The kill-chain to break is indirect prompt injection → excessive agency → improper output handling; design each later step to sever one link.
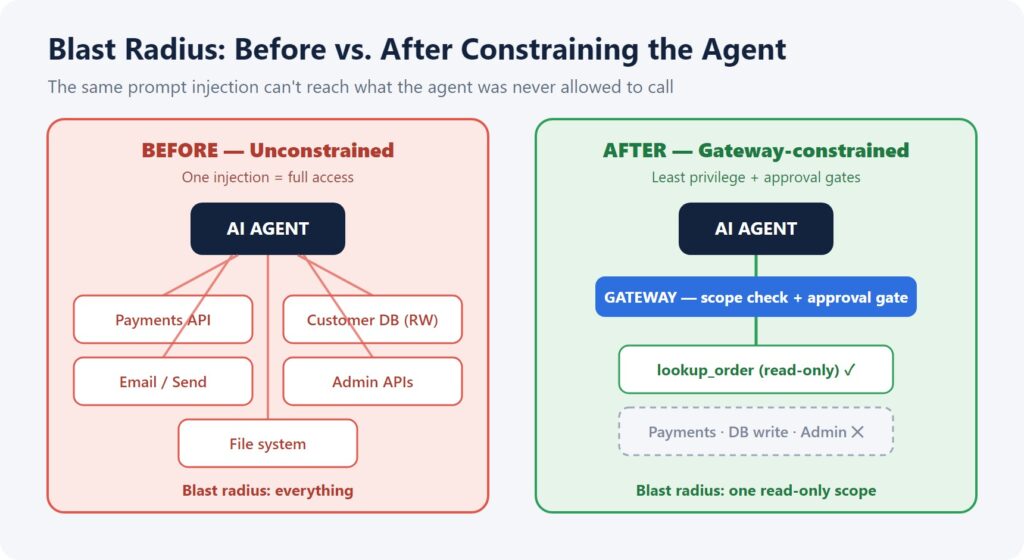
Step 2 — Constrain tools and scopes
Default-deny is the rule here. Give the agent zero permissions to start, then hand it tools one at a time, only as the task actually calls for them — always scoped to the user, never a shared service account. Getting these boundaries right takes real judgment, which is why a lot of teams loop in an AI agent development company instead of guessing at permission levels on their own. Done properly, an injected instruction to wipe records just fails — the tool was never granted in the first place.
Step 3 — Validate inputs and tool outputs
Treat everything entering the context window as hostile — user messages, retrieved documents, and especially returned tool/API payloads. Wrap untrusted content in delimited blocks, strip hidden instructions before embedding, and validate every tool argument against a strict schema. Output handling matters just as much: scan outputs for exfiltration signatures (suspicious URLs, markdown-image beacons, leaked keys) and disable client-side auto-fetch of remote resources. The threat is concrete — a January 2026 study found just five poisoned documents can steer a RAG agent’s responses ~90% of the time.
Step 4 — Redact sensitive data at the boundary
Every external model call can ship PII, secrets, or proprietary code to a provider whose logs you don’t control — and 86% of organizations report no visibility into their AI data flows. Redact before the prompt leaves your perimeter, not after: pattern-match and strip emails, SSNs, API keys, and private keys on the way out, re-inserting tokens on the way back if needed. Doing this once at a gateway — rather than per agent — is the difference between a policy you can audit and one that quietly drifts.
Step 5 — Add approval gates for high-impact actions
Not every action deserves autonomy. Use calibrated autonomy: let the agent run reversible, low-stakes actions freely, but route irreversible or high-impact ones through a human. Gate a defined set of verbs — delete_file, send_email, run_code, update_database, modify_iam_policy — behind explicit confirmation, and tune thresholds by risk and confidence so reviewers aren’t flooded. Replace a bare “Approve?” with a checklist the approver acknowledges: intent, data lineage, permissions chain, expected blast radius, rollback plan.
Step 6 — Monitor, log, and alert
You can’t secure what you can’t see. Capture six fields per access — agent identity, human authorizer, data accessed, operation, policy outcome, and timestamp — and log denied actions, not just permitted ones. Make logs append-only and tamper-evident (e.g., a SHA-256 hash chain), retain them in WORM storage, and establish a per-agent behavioral baseline so you can alert on drift. This is also your incident-response lifeline: the 5% containment confidence above is largely a visibility problem.
Step 7 — Red-team and test continuously
Agents face a moving target — jailbreaks, MCP/tool poisoning, RAG exfiltration, multi-turn social engineering — so test adversarially on a schedule, not once. Map your suite to the OWASP Top 10 for Agentic Applications (published December 2025) and run automated attack agents against staging. Layered defenses work when you measure them: on the AgentDojo benchmark, a guardrail stack like Meta’s LlamaFirewall cut attack success from 17.6% to 1.75% — a ~90% reduction.
The seven steps at a glance
| # | Step | Neutralizes (OWASP Agentic) | Core control |
| 1 | Threat-model | All risks | Enumerate tools, data, and worst-case per tool (MAESTRO) |
| 2 | Constrain tools & scopes | Excessive agency | Default-deny; least-privilege, user-context scopes |
| 3 | Validate inputs & outputs | Prompt injection; improper output handling | Schema-check args; strip hidden instructions; scan outputs |
| 4 | Redact at the boundary | Sensitive data leakage | Strip PII/secrets before the prompt leaves your perimeter |
| 5 | Approval gates | Excessive agency; unsafe tool use | Human sign-off on irreversible/high-impact verbs |
| 6 | Monitor & log | Lack of observability | Append-only logs of allowed and denied actions |
| 7 | Red-team & test | All risks | Continuous adversarial testing vs. the OWASP Top 10 |
A short worked example
Say you’re shipping a support agent that reads tickets and issues refunds.
- Threat-model: worst case is mass unauthorized refunds via a poisoned ticket.
- Scope: grant read_ticket and lookup_order; do not grant raw DB write.
- Validate: schema-check the refund amount; reject tickets containing instruction-like text.
- Redact: strip customer card data before any model call.
- Gate: issue_refund over $50 requires human approval with a rollback note.
- Monitor: log every refund attempt (approved and denied) to an append-only store.
- Red-team: weekly, fire poisoned tickets at staging and confirm the gate holds.
A single malicious ticket now hits a wall at step 2 or 5 — exactly as designed.
Frequently asked questions
What is the first step to secure an AI agent?
Threat modeling. Enumerate the agent’s tools, data, and connectors and the worst-case outcome of each, ideally with a framework like MAESTRO, before you write enforcement rules.
How do I limit what an AI agent can do?
Default-deny tool access, grant the minimum scopes per task, run tools in the user’s context (not a shared service account), and gate high-impact verbs behind human approval.
Can prompt injection be fully prevented?
No. You layer defenses — input/output validation, least privilege, approval gates, and logging — so that a manipulated agent still can’t reach anything dangerous. Measured stacks cut attack success ~90%, not to zero.
Which agent actions need a human approval gate?
Irreversible or high-impact ones — deletes, payments, code execution, database writes, and IAM changes. Tune thresholds by risk and confidence to avoid reviewer fatigue.
How do I know my agent security actually works?
Red-team continuously against the OWASP Agentic Top 10, log permitted and denied actions, and alert on behavioral drift from a per-agent baseline.